Taking Better Pictures: Settings
Today's digital cameras have a plethora of settings, modes, and features, but (apart from luck) taking good pictures comes down to just three basics whether you are using a regular camera or a digital camera. The emphasis in this section will be on digital cameras, but most of this information is applicable to any camera.
Focus
The first consideration is focus. It may seem obvious, but many people don't know how to properly focus their camera. Most of the intermediate and many relatively inexpensive cameras provide variable focus. This means that the focus of the camera is not fixed and the camera — either automatically or under the control of the user — performs some focusing process on the subject. It is very important that you understand how your camera performs the focus operation. On the Canon G3, for example, the focus mechanism works best on vertical lines (horizontal lines if you are taking a vertical picture), so for this camera it is best to look for a feature in the subject which has a crisply defined line to focus on (a vertical line for horizontally oriented pictures, or a horizontal line if you turn the camera on its side to take a vertical picture). Many cameras perform automatic focusing based on a fairly small area in the center of the shot. This is fine, so far as it goes, but following the Rule of Thirds, the subject should be located off-center. How then can you resolve this?
Virtually all cameras that perform automatic focusing do so when you depress the shutter button halfway (pressing it all the way actually takes the picture). The thing to do is to point your camera at the exact location that you want to be in best focus, depress the shutter button halfway and hold it. This action locks-in the focus (i.e., does not cause the camera to refocus before taking the picture) until you release the shutter button, which releases the focus lock. Once you have locked in the focus, without releasing the shutter button, you can again compose your picture before depressing the shutter button the rest of the way and actually taking your picture. You should note that pressing the shutter button halfway also locks in the exposure and f-stop settings at the same time.
Here are some additional tips for getting the best possible focus:
- The area in focus is actually a range (see the section on f-stop below). You probably want to set your focus on an area somewhere in the middle of the range you are most interested in.
- For people and animals, the best focal point is the eyes or face area (the nose is usually good). Since most people concentrate their attention of faces — and the eyes in particular — this is the best focal point for portraits.
- If there aren't any good focal points on your subject (in the case of the G3 that would be vertical lines), then you may actually want to focus on some totally unrelated object that is the same distance, but which has better features for your camera to focus on.
- As a last resort, you can fall back on focusing your camera manually (if it has that ability).
- If you are uncertain of your success in getting the focus you want, try another focusing technique and take another picture. Take several — after all, for digital cameras, they're free!
- One final note: After taking a picture, review the picture using the maximum magnification your camera provides for picture review. Many times a picture that looks decent in a 2-inch monitor turns out to be blurry at full resolution!
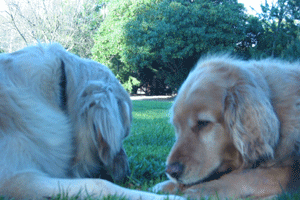
In this picture, the camera focused in the center of the frame, which happened to be quite a bit further from the camera than the subjects, so the subjects are somewhat out of focus.
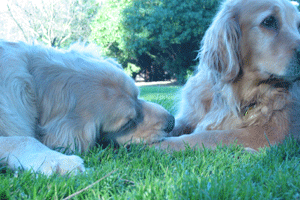
Here, the focus was locked on one of the dogs' faces first, then the picture was recomposed so that the dogs are now in focus and the background is blurry.Exposure: Shutter Speed
The second basic consideration in obtaining your best shot is the shutter speed. The key here is usually to get the fastest speed you can and/or to hold the camera as still as possible while you take the picture. Generally speaking, you want to have a shutter speed of no slower than 1/60th of a second. This is generally the speed that is used when taking flash photographs. If your camera indicates that the automatic exposure is slower than this, you should either use a tripod (if your subject is not moving very quickly) or else use a flash if you can.
Many intermediate cameras will allow you to either lock-in or manually set your exposure. This action is typically combined with the auto-focus process and again uses a rather small area in the center of your frame to set the exposure level.
Here are some additional pointers on getting your best exposure:
- If you are in dim light and do not (or cannot) use a flash, try to find a solid object to rest the camera on while you take the picture.
- In extremely low natural light where even the small shaking that occurs when you press the shutter button can cause a blurred picture, put your camera on a solid object or tripod, compose your picture and then use your remote control (assuming you have one) or self-timer to take the shot.
- In areas of high contrast lighting — such as strong shadows, mottled sunlight, etc. — set your exposure level for the brightest areas and use a flash to illuminate the shadowy areas in your subject (see the section on Lighting)
Exposure: f-stop
The third — and least understood — basic camera setting is the f-stop. This actually refers to the aperture setting, which is the size of the opening between the lens and the film. This is a setting that may not be available on less expensive cameras, since it is more often of interest to more experienced photographers. Both shutter speed and aperture setting work together to provide the proper exposure.
If you think of a properly exposed picture as a bucket of water, imagine the aperture as being the rate of flow — if you have a large aperture (heavy flow), you can fill the bucket in a short period of time; if you have a small aperture (slow stream) it will take a longer period of time to fill the same bucket.
The f-stop number is actually the bottom half of a fraction that indicates how wide the aperture is so, for example an f-stop of f/2 is a larger aperture than an f/stop of f/8, just as 1/2 is greater than 1/8.
This means that the larger the f-stop, the smaller the aperture.
Thus, given a fixed exposure, the picture may be underexposed at f/8, but overexposed as f/2.Depth of Field
Depth of field is the range of distance from the camera that is in relatively good focus. The second characteristic of the f-stop is that it affects the depth of field of the picture. You may want to have a narrow depth of field so that your subject is in focus while the background (and/or foreground) is blurry. A larger depth of field may be especially useful if you don't have time to focus accurately.
To decrease the depth of field (reduce the range from the camera which is in good focus):
- Decrease the f-stop (makes the aperture larger)
- Decrease the distance from your subject
- Increase your optical zoom
If you want to increase the depth of field to capture as much as possible in good focus:
- Increase the f-stop (making the aperture smaller)
- Get further away from your subject
- Decrease your optical zoom (zoom out)
Digital cameras tend to have excellent depth of field, so it was difficult to illustrate this aspect of the f-stop. Nevertheless, the two pictures below were taken under identical conditions, the only difference being a changing of the f-stop (with a corresponding change in the exposure time).
You can see how just making that one change altered the appearance of the picture noticeably.
Each picture was taken using a tripod at the minimum camera distance of approximately 10 inches.
This picture was shot at f/2.2 for 1/20th of a second.
More Information
No matter what kind of digital camera you have, I highly recommend getting A Short Course in <your camera name here> Photography published by ShortCourses.com. This is an inexpensive book, published on demand and covers most of the photography basics, as well as how to make them work on your camera! They have customized the text to explain the controls and use of whatever camera you have. It's what should have been included with your camera

